
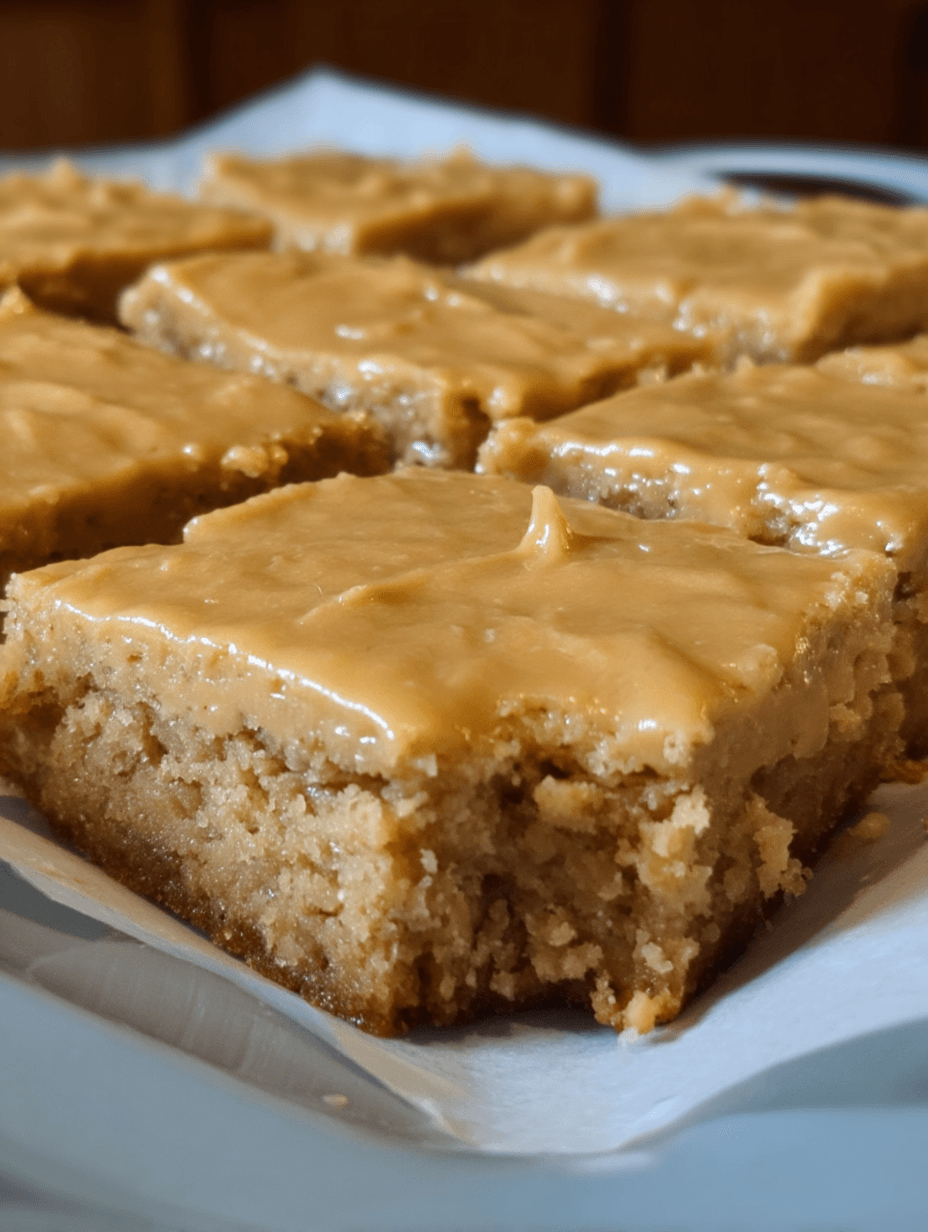
If you love old-fashioned school cafeteria desserts, these Peanut Butter Lunch Lady Bars are the kind of treat that brings back memories with the first bite.
They are soft, rich, and intensely peanut buttery, with a texture somewhere between a chewy cookie and a fudgy brownie. The bars are baked in one large sheet pan, then covered with a warm, silky peanut butter frosting that settles into a smooth, creamy layer as it cools.
The original recipe makes 16 to 24 bars and takes about an hour from start to finish, including cooling and frosting.
Why You’ll Love These Peanut Butter Bars
These bars have everything you want in an easy dessert.
They’re made in one pan, so there’s no need to scoop individual cookies or chill dough. The batter is simply spread into a sheet pan and baked.
The peanut butter flavor appears in both the bars and the frosting, giving the dessert a rich, unmistakable peanut butter taste.
The frosting is especially delicious. Instead of a thick buttercream, it’s poured warm over the cooled bars, creating a smooth glaze-like topping.
They’re also excellent for feeding a crowd, making them perfect for potlucks, bake sales, school events, family gatherings, and holiday dessert tables.
Ingredients You’ll Need
For the Peanut Butter Bars
- 2 cups all-purpose flour
- 2 cups granulated sugar
- 1 teaspoon baking soda
- 1 teaspoon salt
- 1/2 cup whole milk
- 1 teaspoon vanilla extract
- 2 large eggs, beaten
- 1 cup unsalted butter
- 1 cup creamy peanut butter
For the Peanut Butter Frosting
- 1/2 cup unsalted butter
- 1/2 cup creamy peanut butter
- 2 tablespoons milk
- 4 cups powdered sugar
These quantities follow the published recipe.
How to Make Peanut Butter Lunch Lady Bars
1. Prepare the Baking Pan
Preheat your oven to 400°F.
Grease a large sheet pan, approximately 13 × 18 inches.
For easier removal and cleaner edges, line the pan with parchment paper, leaving enough overhang to lift the finished bars out after cooling.
The parchment is especially helpful when you’re planning to cut the bars neatly.
2. Combine the Dry Ingredients
In a large mixing bowl, whisk together the flour, granulated sugar, baking soda, and salt.
Make sure the baking soda and salt are evenly distributed throughout the flour.
Set the bowl aside.
3. Prepare the Wet Mixture
In a separate bowl, combine the milk, vanilla extract, and beaten eggs.
Whisk until the ingredients are well blended.
Set this mixture aside while you prepare the peanut butter base.
4. Melt the Butter and Peanut Butter
Place 1 cup of butter and 1 cup of creamy peanut butter in a medium saucepan.
Heat over medium heat, stirring as the butter melts.
Continue heating until the mixture reaches a gentle boil.
Once it begins to boil, remove the saucepan from the heat.
The mixture should be smooth, creamy, and completely combined.
5. Combine the Batter
Slowly stir the dry ingredients into the warm butter-and-peanut-butter mixture.
Once incorporated, add the milk, vanilla, and egg mixture.
Stir until the batter is smooth and evenly combined.
Don’t overmix once everything comes together.
The finished batter should be fairly thick but spreadable.
6. Spread the Batter
Transfer the batter to the prepared sheet pan.
Use a spatula to spread it evenly from corner to corner.
Try to keep the thickness as uniform as possible so the bars bake evenly.
7. Bake
Place the pan in the preheated oven.
Bake for approximately 20 minutes, or until a toothpick inserted into the center comes out clean.
Don’t rely only on the color of the edges. Check the center because that’s where the bars will take the longest to bake.
8. Cool Completely
Remove the pan from the oven.
Allow the bars to cool completely in the pan before adding the frosting.
This is an important step.
The frosting is poured on while warm, so the bars themselves need to be cool enough that the frosting doesn’t simply melt into the surface.
How to Make the Peanut Butter Frosting
1. Melt the Butter and Peanut Butter
Place 1/2 cup butter and 1/2 cup peanut butter in a small saucepan.
Heat over medium heat until melted and smooth.
Bring the mixture just to a boil, then immediately remove it from the heat.
2. Add the Milk
Stir 2 tablespoons of milk into the warm peanut butter mixture.
Mix until smooth.
3. Add the Powdered Sugar
Gradually add the powdered sugar, stirring continuously.
Continue mixing until the frosting becomes smooth and spreadable.
Because the frosting is made while warm, it should have a pourable consistency.
4. Frost the Bars
Pour the warm frosting over the completely cooled bars.
Use a spatula to spread it evenly across the entire surface.
Work fairly quickly because the frosting will begin to set as it cools.
Allow the frosted bars to sit at room temperature until the topping has firmed up.
The Secret to Soft Peanut Butter Bars
One of the biggest advantages of these bars is their texture.
The combination of butter and peanut butter creates a rich, tender base, while the sheet-pan format keeps the bars relatively thin.
The key is not to overbake them.
Start checking around the 20-minute mark. A toothpick inserted into the center should come out clean when they’re ready.
If you bake them considerably longer than necessary, the edges can become dry before the center has finished setting.
Why the Warm Frosting Works So Well
The frosting isn’t treated like traditional buttercream.
Instead, the butter and peanut butter are heated together before milk and powdered sugar are added.
The warm frosting can then be poured directly over the cooled bars.
This creates a smooth, glossy-looking peanut butter topping that sets as it cools.
It also means you don’t have to spend time carefully piping or decorating the dessert.
Just pour, spread, and let it set.
Can You Add Chocolate?
Absolutely.
Peanut butter and chocolate are a classic combination, so there are several easy ways to change these bars.
Chocolate Frosting
Replace the peanut butter frosting with your favorite chocolate frosting.
The original recipe also suggests using chocolate frosting as an alternative.
Chocolate Chips
Sprinkle semisweet or milk chocolate chips over the warm bars immediately after they come out of the oven.
Allow them to soften slightly before spreading them into a thin chocolate layer.
Chocolate Drizzle
Once the peanut butter frosting has set, drizzle melted chocolate over the top.
Allow the chocolate to firm before cutting.
Add Cocoa to the Frosting
A small amount of cocoa powder can also be incorporated into the frosting for a chocolate-peanut-butter combination.
Add Chopped Peanuts
If you want extra crunch, sprinkle chopped roasted peanuts over the warm frosting.
The nuts add texture and make the bars look even more homemade.
For the strongest peanut flavor, use roasted peanuts.
How to Get Clean-Cut Bars
For bakery-style squares, let the frosting set completely before cutting.
Use a large sharp knife.
Wipe the blade clean between cuts if necessary.
For especially neat edges, refrigerate the finished bars briefly before slicing.
If you prefer a casual dessert, simply cut the sheet into uneven squares.
Either way, they’ll taste delicious.
Perfect for Parties and Potlucks
These bars are especially convenient when you’re feeding a group.
Instead of baking dozens of individual cookies, you spread one batch into a large sheet pan.
The original recipe yields approximately 16 to 24 bars, depending on how large you cut them.
They’re ideal for:
- School events
- Bake sales
- Potlucks
- Birthday parties
- Family reunions
- Church gatherings
- Picnics
- Holiday dessert tables
- Afternoon snacks
Tips for the Best Results
Use creamy peanut butter. It creates the smoothest batter and frosting.
Don’t skip the parchment. It makes removing and cutting the bars much easier.
Measure the flour carefully. Too much flour can make the bars dry.
Don’t overbake. Start checking the center around the recommended baking time.
Cool the bars completely before frosting. This helps the warm frosting remain on top instead of melting into the cake.
Pour the frosting while warm. It becomes harder to spread smoothly once it cools.
Let the frosting set before cutting. This gives you cleaner slices.
How to Store Peanut Butter Lunch Lady Bars
Once the frosting has completely set, place the bars in an airtight container.
They can be kept at room temperature, covered, for up to 3 days according to the original recipe.
For longer storage, refrigerate them for up to about a week.
Allow refrigerated bars to come closer to room temperature before serving for the softest texture.
Can You Freeze These Bars?
Yes.
Wrap the bars tightly and place them in a freezer-safe container.
The original recipe recommends freezing them for up to 2 months.
Thaw them overnight in the refrigerator.
For the best texture, allow the bars to come toward room temperature before serving.
Frequently Asked Questions
Can I use crunchy peanut butter?
Yes, although creamy peanut butter produces a smoother texture. Crunchy peanut butter will add small pieces of peanuts throughout the bars and frosting.
Can I use a smaller pan?
You can, but the batter will be thicker and will require a longer baking time. Keep a close eye on the center and test it with a toothpick.
Why are my bars raw in the middle?
The pan may have been too small, causing the batter to be deeper than intended, or the bars may simply need additional baking time. The original recipe is designed for a large approximately 13 × 18-inch sheet pan.
Can I make the bars ahead?
Yes. They can be prepared ahead and stored covered. The original recipe notes that their texture can actually improve the next day.
Can I add chocolate?
Definitely. Chocolate frosting, chocolate chips, or a chocolate drizzle all pair beautifully with the peanut butter base.
A Nostalgic Dessert Everyone Will Love
Peanut Butter Lunch Lady Bars are the perfect example of why old-fashioned recipes remain so popular.
They’re uncomplicated, generously sized, easy to transport, and packed with the comforting combination of peanut butter, butter, and sugar.
The soft peanut butter bars are delicious on their own, but the warm peanut butter frosting takes them to another level.
Make a pan for a potluck, bake sale, family gathering, or simply keep a batch around for afternoon treats.
Once the frosting sets and you cut into that first soft, rich square, you’ll understand why this classic-style dessert is so hard to resist.