
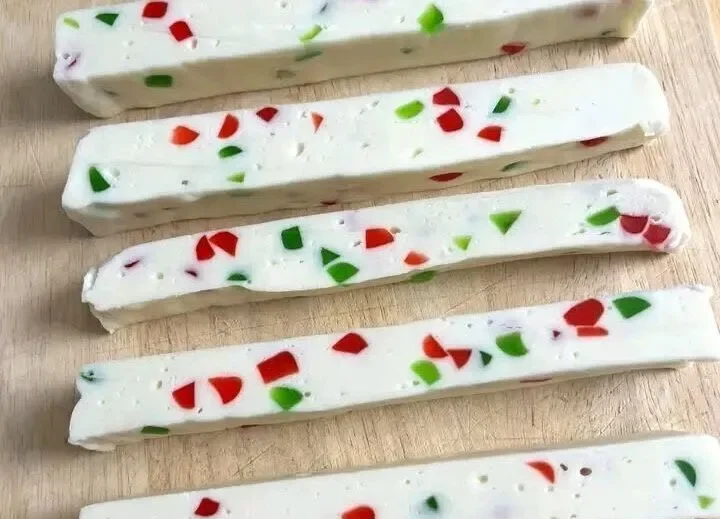
Christmas Confetti Bars: An Easy No-Bake Holiday Treat
If you need a Christmas dessert that looks festive, tastes delicious, and doesn’t require hours in the kitchen, these Christmas Confetti Bars are a great choice. They’re creamy, sweet, colorful, and incredibly simple to prepare.
Made with white chocolate, sweetened condensed milk, butter, vanilla, and colorful red and green candies, these bars come together with very little effort. There’s no complicated dough, no decorating skills required, and no long baking process.
They’re especially handy during the holidays when you need something easy for a cookie exchange, Christmas party, dessert table, or homemade gift box.
Why You’ll Love These Christmas Confetti Bars
There are plenty of reasons to keep this recipe in your holiday dessert rotation.
First, the recipe requires only a handful of basic ingredients. Most of the work involves gently melting the ingredients together, mixing in the colorful candies, and allowing everything to chill until firm.
The finished bars are also naturally eye-catching. The creamy white candy base creates a perfect contrast with red and green pieces, giving them that classic Christmas appearance without needing frosting or elaborate decorations.
They can also be prepared ahead of time, making them convenient when you’re cooking several dishes for a holiday gathering.
Ingredients
You’ll need:
- 3 cups white chocolate chips
- 1 can (14 ounces) sweetened condensed milk
- 2 tablespoons butter
- 1 teaspoon vanilla extract
- A small pinch of salt
- 1 cup red and green candied cherries or gumdrops, finely chopped
The red and green candies are what give these bars their signature confetti appearance. You can chop them fairly small so that colorful pieces are distributed throughout every bite.
How to Make Christmas Confetti Bars
1. Prepare the Pan
Start by lining an 8-by-8-inch baking pan with parchment paper.
Leave some parchment extending over the edges. This makes it much easier to remove the chilled candy from the pan later.
For the cleanest results, try to press the parchment flat against the bottom and sides of the pan.
2. Melt the Chocolate Mixture
Add the white chocolate chips, sweetened condensed milk, and butter to a saucepan.
Place the saucepan over low heat and stir continuously.
Keep stirring until the white chocolate has melted completely and the mixture becomes smooth and creamy. Avoid using high heat because white chocolate can scorch easily.
3. Add Vanilla and Salt
Once the mixture is smooth, remove the saucepan from the heat.
Stir in the vanilla extract and a small pinch of salt.
The vanilla adds extra flavor, while the tiny amount of salt helps balance the sweetness of the condensed milk and white chocolate.
4. Add the Christmas Candies
Let the mixture cool for a couple of minutes.
Then gently fold most of the chopped red and green candies into the warm chocolate mixture.
Work fairly quickly at this stage. As the mixture cools, it will begin to thicken and become harder to spread.
5. Transfer to the Pan
Pour the mixture into the parchment-lined pan.
Use a spatula or the back of a spoon to spread it into an even layer.
Scatter the remaining chopped candies over the top and gently press them into the surface.
This creates a colorful Christmas confetti effect on top of every bar.
6. Chill Until Firm
Place the pan in the refrigerator for approximately 2 to 3 hours.
The candy should become completely firm before you attempt to cut it.
For the cleanest slices, don’t rush this step.
How to Cut Clean Christmas Bars
Once the candy has completely set, lift it from the pan using the parchment paper.
Transfer the slab to a cutting board.
Use a large, sharp knife to cut it into long, narrow bars.
For a Christmas cookie platter, you can also cut the slab into smaller squares. Smaller pieces work particularly well because these bars are rich and sweet.
For cleaner cuts, wipe the knife between slices.
Helpful Tips for Making Them
Keep the heat low. White chocolate can become difficult to work with if overheated, so gentle heat is important.
Stir constantly. Continuous stirring helps create a smooth mixture and prevents ingredients from sticking to the bottom of the saucepan.
Work quickly after adding the candy. The mixture starts firming as it cools, so spread it into the pan while it’s still easy to handle.
Chill completely. Trying to slice the bars before they are fully firm can result in uneven pieces.
Use parchment paper. The overhanging parchment makes removing the entire slab much easier.
Make smaller pieces for gifting. Because the bars are quite rich, small portions are ideal for holiday gift boxes.
Can You Make These Ahead of Time?
Yes. These Christmas Confetti Bars are well suited to preparing ahead of a holiday gathering.
Once completely firm, keep them refrigerated until you’re ready to serve them. Preparing them in advance can free up valuable kitchen time on the day of a Christmas party.
If you’re making them for a dessert platter, cut them into bite-sized pieces shortly before serving.
Perfect for Christmas Parties and Cookie Trays
These colorful bars are especially useful when you need a dessert that looks festive without spending hours decorating it.
Arrange the pieces alongside Christmas cookies, fudge, brownies, or other holiday candies. The red and green pieces make them immediately recognizable as a Christmas treat.
They’re also a fun option for homemade holiday gift boxes. Simply cut them into smaller portions and arrange them neatly with other homemade sweets.
Easy Variations
The basic recipe is simple enough to customize.
You can experiment with different colors of chopped candies for other holidays or celebrations. For Christmas, red and green provide the traditional festive appearance.
You can also change the shape. Instead of narrow bars, cut the chilled slab into small squares for a party tray.
The key is to keep the basic creamy white chocolate mixture consistent while changing the colorful additions to suit the occasion.
Frequently Asked Questions
Do Christmas Confetti Bars need to be refrigerated?
For best results, keep them refrigerated while storing them. Chilling also helps the bars maintain their firm texture.
Can I cut them into squares instead of bars?
Absolutely. Squares are particularly convenient when you’re serving them on a large Christmas dessert platter.
Why are my bars difficult to cut?
They may not have chilled long enough. Make sure the candy is completely firm before slicing. A sharp knife and wiping the blade between cuts can also help.
Can I make a larger batch?
Yes, especially if you’re preparing treats for a holiday gathering or making several gift boxes. When increasing the quantity, use an appropriately sized pan so the mixture maintains a manageable thickness.
Final Thoughts
Christmas baking doesn’t always have to involve complicated recipes. These Christmas Confetti Bars are a simple way to create a colorful homemade holiday treat using just a few ingredients.
The creamy white chocolate base, sweet condensed milk, and bright red and green candies make them both delicious and festive. Best of all, they require no complicated decorating and only a short amount of hands-on preparation.
Make a batch for your Christmas cookie tray, holiday party, or homemade gift box, and cut them into smaller pieces so everyone can enjoy a bite-sized festive treat.